by avi | May 23, 2024 | Tips
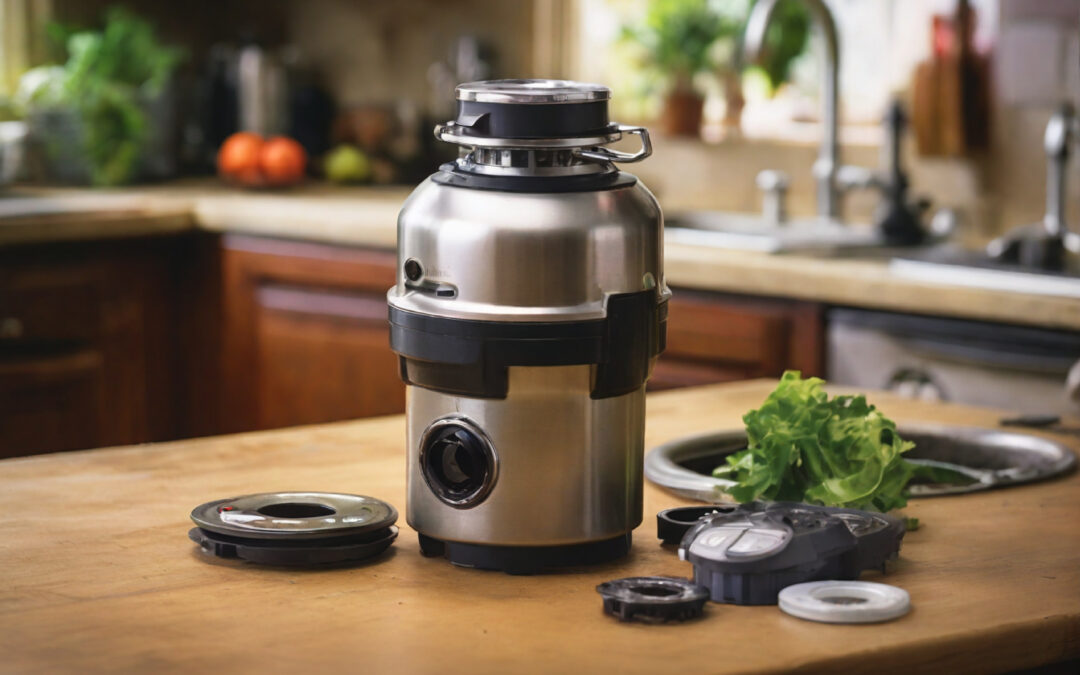
Capping off the dishwasher drain on a garbage disposal is a straightforward process. The truth is the whole process is easier until you know the proper way how to cap off the dishwasher drain on the garbage disposal. This guide will provide you with step-by-step instructions to ensure the job is done properly.
Tools and Materials You Will Need
- Flathead Screwdriver,
- Hammer,
- Hose Clamp,
- Dishwasher Drain,
- Adjustable Wrench,
- Towels,
- Bucket.
Step-by-step process on how to cap off dishwasher drain on garbage disposal
Safety First
Ensure both devices are turned off. So carefully unplug or turn off the power at the circuit breaker. Place a bucket under the sink and catch any unnecessary water.
Disconnect The Dishwasher Drain Hose
Locate the washer drain hose connected to the garbage disposal. Normally it’s attached to a small nozzle on the side of the unit. Use a flathead screwdriver to loosen up the clamp that secures the hose to the disposal unit. Slide the hose clamp away from the nozzle.
Carefully pull the drain hose off the nozzle. Also, be ready as some water may overflow from the drain while going along the process. So this is why you need to have.
Prepare To Cap The Dishwasher Drain
Once the drain hose is removed inspect the nozzle on the disposal. If it’s dirty and has debris, Clean it to ensure a proper seal or cap. If your garbage disposal comes with a knockout plug, locate it. Alternatively, you can purchase a dishwasher drain plug from a hardware store.
Cap The Dishwasher Drain
Place the dishwasher drain cap or plug over the nozzle where the hose was connected. If you are using a plug that requires a hose clamp, slide the hose clamp over the cap and tight it up securely. Use a flathead screwdriver to prevent leaks. Some plugs may require you to tap them into place with a hammer. If so gently avoid damaging the garbage disposal.
Checks for Leaks
Once the cap is placed turn it on power back on and run some water to test for leaks. If water leaks from the capped nozzle, close the hose clamp further or ensure the cap is seated correctly.
Re-Secure Everything
Ensure that all connections and clamps are secure. Clean up any remaining water debris around the work area. Double-check both units and restore them.
Tips and Troubleshooting
Hose Clamp
Ensure the hose clamp is tight enough to prevent any leaks but not very tight so that it could damage the cap and plug.
Proper Fit
Make sure the cap or plug is the correct size for the nozzle for the disposal unit. An improper fit can lead to leaks.
Testing
Always run water and test the capped area to confirm there are no leaks before finishing the job.
Conclusion
Capping off a dishwasher drain on a garbage disposal is simple and can be completed with a few basic tools and careful attention to detail. By following the proper steps how to cap off dishwasher drain on garbage disposal you can make sure you can do your job correctly. This will also help you avoid potential leaks and issues. Whether you’re temporarily unclogging your dishwasher or eradicating it, this guide will help you effectively seal the drain.

by avi | May 23, 2024 | Tips
Removing an InSinkErator sink flange may seem like a difficult job. But ultimately it’s not that of a big deal if one knows the right process. Using the right tools and knowing the right process on How to Remove the InSinkErator Sink Flange is necessary. Whether you need to replace a garbage disposal or repair a leak, this comprehensive guide will help you dispose of a sink safely and efficiently.
Tools and Materials You Will Need
- Adjustable Wrench,
- Screwdriver,
- Putty,
- Hammer,
- Pilers,
- Bucket,
- Towel and rags.
Step-By-Step Guide on How To Remove InSinkErator Sink Flange
Safety First
Before you start make sure the power to the disposal is turned off. So unplug the unit or turn off the circuit breaker. Clear out the area under the sink to get yourself a lot of open space.
Disconnect Garbage Disposal
Place a bucket under the sink to catch any water and debris that is bound to fall during the process. Use the wrench to disconnect the pipe from the unit.
Remove The Garbage Disposal Unit
Most InSinkErator models have a quick-lock ring mounting system. Use a Screwdriver to loosen up the lock system. Once the ring is loosened, you will be able to detach the sink flange. While doing so carefully lower the unit and set it aside.
Remove The Sink Flange
Use the screwdriver to lose and remove the screw. The sink flange is usually held in place by a snap ring. Now use the pliers to remove the snap ring from the flange. Once the snap is removed push the flange through the sinkhole from underneath. In a matter of stuck simply just hit it with a hammer to loosen it up.
Clean the Sink Area
After removing the flange, clean the area around the sink. Remove any old plumber putty or debris to ensure a smooth surface for the new flange.
Tips for Reinstallation Replacement
Applying Plumbers Putty
If you are reinstalling the same flange or installing a new one, apply the plumber’s compound to the underside of the flange before inserting it into the sink. This helps create a watertight seal.
Reattach the Disposal Unit
Follow the manufacturer’s instructions and reattach the garbage disposal unit with the new one. Ensure all the connections are secure and there are no leaks after restoring power.
Conclusion
Removing an InSinkErator is not a difficult task or challenging. By following simple steps and a few steps you can also learn how to remove InSinkErator sink flange safely and easily. Whether it’s replacing removing, or fixing leaks a proper guide is necessary and very affordable. While fixing if you see or face any difficulties you can talk to our professionals at Ace Plumbing Repair. Contact our expert for solutions or major difficulties you can make a schedule as well.
by avi | May 13, 2024 | Tips, Uncategorized
A garbage disposal is a common fixture in modern kitchens. Offering a modern and useful way to dispose of food waste and other particles. It’s a device installed beneath the sink which connects to the drain. These devices use a motor with small blades that help to cut food scrapes into small particles. While it’s a useful device still some may need to figure out how to remove a garbage disposal and return to original sink drain.
Where the main reason can be things like clogs and maintenance. Which is really a serious annoyance for most people. Managing a garbage disposal is hard not just a simple process. This guide will help you walk through the process of how to remove a garbage disposal and return to original sink drain.
What is a garbage disposal?
Before you start it is necessary to figure out how garbage disposal works. As well as how to remove them or replace them. A disposal is an electrical device that fits between the sink drain and the trap. The machine helps to grind the food into small scraps and food waste into tiny pieces. Being a convenient machine they are still prone to jamming, leaks, and other failure. Also, some homeowners don’t prefer to use this unit as they require more electrical usage.
Tools You Need
Before starting the removal process, ensure you have the following tools and materials ready:
- Adjustable wrench
- Phillips and flat-head screwdrivers
- Plumber’s putty
- Bucket or pan (to catch any residual water)
- A new sink drain assembly (if you plan to revert to a traditional sink drain)
- Pipe wrench or Channellock pliers
- Towel or rag
- Wire Nuts and Electrical tapes
- Voltage tester
Step-by-step guide on how to remove a garbage disposal and return to original sink drain
If you are sure about going back to your previous drain system leaving the disposal unit. This will require the right knowledge and way to complete the whole process. To tell the truth, knowing how to remove a garbage disposal and return to original sink drain is a must for DIY individuals. This will not only offer you satisfaction and ideas. It will also help you save some money which you will spend on plumber work.
So, let’s dive into the step-by-step process:
Safety and Precaution
The first and most important step before you start to work is having the correct advancement knowledge. While having safety along the way so it may not inflict any danger.
Electrical Safety
Turn off the breaker to cut off the power for the unit. To ensure the device is off and has no more voltage use the voltage tester. Confirm firmly that the device is indeed off. This will make sure there is no danger or accidental activation while working.
Clear Space
Remove any items you have around the unit or your sink. A clear space for working helps to be fluent in terms of work. Which offers tools to use the force and minimal space they require.
Initial Assessment
Before you start learn how the disposal is connected to your sink. Knowing helps to identify and clarify work methods for better and safer planning. Note the type of connection and plan along the work sequence. If the machine has a hardwire connection and you don’t feel comfortable. You should take consulting or as well hire an electrician.
Detailed Removal Process
Plumbing Connection
Position your bucket under the disposal unit to catch any dripping water. Now use the wrench or the pliers to disconnect the drain pipe from the disposal unit. If there’s a dishwasher drain hose attachment, try to loosen up the clamp and detach the hole.
Electrical Disconnection
If your unit has an out outlet simply just unplug the device. For any unit with a hardwiring connection, remove the plate to expose the wires. Then cut out the wires which gives away connection and secure them. In terms of securing the connection use the electrical tapes and the wire nuts for protection and no further damage.
Garbage Disposal Installation
Removing the Garbage Disposal
Loosening the Mounting Ring
For disposal units, they are simply held in a place with the help of a mounting ring. Which can twist off. To do this simply just support the unit and use the other hand to turn the mounting ring. Make sure to turn in the counterclockwise which will loosen up the unit. Then simply just lower the device.
Removing the Assembly
Now the dispola is out you need to loosen up the fitting and mounting assembly. By losing all the screws you will clear all the difficulties then just pry open the assembly. After cleaning off the assembly clean all the dust and putty from the sink opening.
Installing a New Sink Drain
Prepping the New Drain
Take your new sink drain assembly and apply a sum amount of putty. Make sure you have a good amount of putty around the base. Press the drain into the sink opening, ensuring a tight fit.
Securing From Below
Under the sink, place the washer nut the drain into to correct place and tighten up securely. Remove any excess plumber putty that squeezes out around the drain.
Reconnecting Plumbing
Reattach the P-trap and the drainpipe to the new sink drain. Use a wrench to tighten the connection. Make sure the tightening is minimal so it does not damage the pipes.
Final Steps and Troubleshooting
- Leak Testing: Turn on the water and fill the sink, then drain it while checking for leaks under the sink. Tighten any connections if you find drips.
- Electrical Safety Check: If you have to deal with hardwired electrical connections, double-check that all wires are safely capped and secured away from any water sources.
- Cleanup and Storage: Clean up your workspace, dry any spilled water, and store your tools. Dispose of the old garbage disposal according to local regulations. Which may involve recycling or special disposal methods due to its electronic components.
Troubleshooting Common Issues
- Spills at New Channel: Assuming you notice spills, guarantee that the handyman’s clay is perfectly located. Additionally, ensure the association is tight. Once in a while, reapplying the handyman’s clay or fixing the nut a touch more can tackle the issue.
- Inadequate Electrical Separation: Assuming you’re uncertain about electrical disengagement. Particularly on account of designing, counsel an expert circuit repairman to stay away from chances.
- Trouble Eliminating Old Equipment: A few parts might be eroded or firmly fixed. Applying infiltrating oil can assist with slackening them. On the off chance that you’re as yet unfit to eliminate parts, it very well may be an ideal opportunity to call an expert.
Conclusion,
Removing a grange disposal and riveting to a traditional sink is a simple project. It can easily be done by homeowners as well. Just by simply knowing how to remove a garbage disposal and return to original sink drain is enough to do the job. If at any point you feel uneasy and uncomfortable doing the job it’s okay to leave it. Especially dealing with electrical systems we offer no positivity to this. Unless you are a professional first make sure you are safe from any risk. With patience and attention to detail, you will be able to achieve your goal and complete the task.
FAQ
- Do I want extraordinary devices for eliminating waste disposal?
- No, essential instruments like pincers, a screwdriver, and a wrench are ordinarily adequate. A handyman’s wrench can be convenient for difficult associations.
- Might I at any point reuse the current sink channel after eliminating the removal?
- Indeed, you can assume the channel is looking great. Cautiously investigate it, guarantee a legitimate seal, and reconnect it safely during reinstallation.
- Are there explicit moves toward following while detaching the removal?
- Indeed, switch off the power, separate the pipes, release the mounting get-together, and cautiously eliminate the removal. Observe the producer’s rules for your particular model.
- Do I want proficient assistance to eliminate waste disposal? A. While it’s a Do-It-Yourself accommodating errand, if you’re questionable or experience challenges, counseling an expert handyman guarantees a smooth and safe evacuation process.
by avi | May 6, 2024 | Tips
When you think about your kitchen appliances you can recognize garbage disposal is important. It’s like an essential appliance like other appliances. This simple unit helps you to keep your kitchen clean and get rid of food scraps. But here is the most concerning question most people ask around which is “Who installs a garbage disposal plumber or electrician”. It is really a concerning question because first of all the device is part of electrical expertise. When the working mechanism of the device requires plumbing expertise. So, you need both water and electrical expertise. Now, you need to get the thing right because who wants a mess in the kitchen right? So, without further dew let’s delve into the question for further explanation.
Who installs a garbage disposal plumber or electrician?
Installing a garbage disposal is a big deal because it makes your workflow smoother. It also provides a smarter outlook for easier chores. Who installs a garbage disposal plumber or electrician most feel confused about this question. Now the real answer is that whether you need both or just one depends on your kitchen setup. If your kitchen needs pipeline work you will need the help of an expert plumber. Again if your kitchen needs electrical work then you will need the help of an electrician as well. This may be for simple electrical work, wiring, switch or integration, etc.
The installation of a garbage disposal unit requires both plumbing and electrical connections.
Let’s first discuss simple things and their responsibility for a garbage disposal unit:
The plumber responsible for installing a garbage disposal plumber
A plumber has the primary responsibility for installing a grange disposal unit into the sink. They ensure the unit has a proper connection and the right installation. This includes attaching the unit to the sink and installing tight selling to prevent any leaks. They also take care of the job if your disposal has a connection to your dishwasher pipeline.
Electrician responsible for installing a garbage disposal plumber
If your disposal requires connection to any kind of electrical system. The necessity will ensure you need help from an expert electrician. Things like directing and redirecting your installation are also a part of their job. Some disposal has an outlet under the sink. Which might not require the need for an electrician if the outlet has the proper configuration. However, if your unit needs new wiring or a new circuit then an electrician’s expertise is necessary.
In some cases if a garbage disposal unit has plug and play connection. Then your plumber can handle the electrical work and all the connections themselves. However, for new installations or modifications, your system may require an electrician. They will also compile with the local codes and safety standards.
Consideration of whom to choose for garbage disposal installation work
Who installs a garbage disposal plumber or electrician this question troubles a lot of people. As most face concussion on which is to choose. First, you need a plumber for piping work on the other hand you have electrical complications. So, whom you need for a new garbage disposal installation depends on the setup of the kitchen. Also, it can vary depending on the type of garbage disposal installation. Here are some things to consider for garbage disposal installation:
Existing Setup with Outlet
If your kitchen already has a pre-existing outlet or power switch under the sink. So with a setup like that, your plumber is good enough to do the work. They can handle the job by themselves which is why you don’t need an electrician. For the connection yourself, your plumber can connect the dots to plug in.
No Existing Outlet Or Direct Wiring
If your kitchen or the sink has no existing outlet under the sink. You may need to call for an electrician who will install the hardwire connection. As well do the wiring jobs. An electrician will make sure your electrical work is done safely and maintained by local code. After the electrical work is done then your plumber can install the disposal unit itself.
DIY Installation
If you are comfortable with DIY installation and projects you can do it yourself. But make sure you take over the responsibility if it’s just a simple replacement. It’s good enough for you if you are not doing any alternation or electrical setup. But if you make sure you need modification and new installation then you are better off hiring someone for the job. Still, it’s safer to hire a professional.
Is hiring a plumber better than hiring an electrician for garbage disposal installation
In most cases hiring a plumber is more appropriate than hiring an electrician. Grange disposal is mainly an appliance for the kitchen. So by hiring an electrician, you will also need to hire a plumber as well. Try to figure out someone who has both the expertise. Which will make you spend less but have the same result.
While garbage disposal requires electrical work to operate. Still, it falls under application under the plumber. This means they are good enough for plumbers to get the job done. Because it’s just a straightforward installation even for a plumber.
If your specific installation requires a new electrical installation and wiring complication. You should hire someone professional who will get the job done. They will make sure your installation is done safely while maintaining local codes. They will also add the additional modifications your installation needs.
Why plumbers are better for who installing a garbage disposal plumber or electrician
Expertise in plumbing systems
Garbage disposals are generally installed into the plumbing system of a kitchen sink. This is why plumbers have extensive knowledge and experience. They work with fixtures and systems, making them ready to handle the installation process seamlessly.
Proper connection to plumbing lines
Installing a garbage disposal involves connecting it to the existing plumbing lines. Plumbers know the intricacies of these connections. Ensuring that the disposal has proper integration into the plumbing system. As they will also make sure to prevent leaks or drainage issues.
Familiarity with local codes and regulations
Plumbers are familiar with local building codes and regulations related to plumbing installations. They ensure that the installation complies with these standards. Reducing the risk of any legal or safety issues down the line.
Handling of drainage issues
Garbage disposal can put additional stress on kitchen plumbing, which can lead to drainage problems if not installed correctly. Plumbers can assess existing plumbing and make the necessary adjustments to eliminate, ensure proper drainage, and prevent blockages.
Conclusion,
There are different types of garbage disposal systems available in the market. So figuring out which suits your style is really something considerable. But if you are having trouble with who installs a garbage disposal plumber or electrician. Well then look no more. You can try out Ace Plumbing Repair our company offers deeper investigation to provide better plumbing service. Using our inspection you will be able to assure if you need a plumber or an electrician. Our plumber will be able to provide you with advice on whatever you should do. We always ensure that you never cost extra and make any costly repairs.
by avi | Apr 29, 2024 | Tips
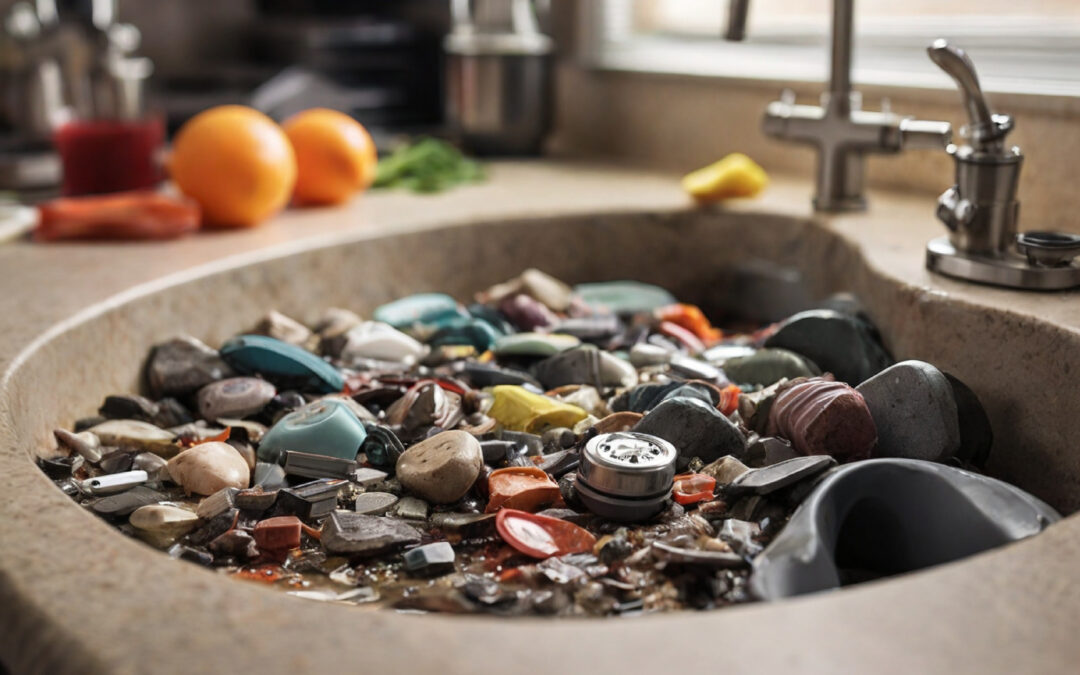
Maintaining the functionality of your garbage disposal is crucial for smooth kitchen operations. Rocks accidentally finding their way into the disposal can cause significant damage. In this guide, we’ll walk you through the process of how to get rocks out of garbage disposal. We will talk about the safer removal of the rocks. As well as discuss prevention, maintenance, and proper disposal techniques.
What is A Garbage Disposal Units
Before we delve into the removal process, let’s take a moment to understand how garbage disposal units work. Typically installed beneath kitchen sinks. These units are ready to grind food waste into small particles. Preventing clogs in the plumbing system. They consist of a grinding chamber, impellers, and a motor that powers the grinding mechanism.
Does rock cause a clog to the garbage disposal unit?
Rocks can indeed cause clogs in garbage disposal units. While garbage disposal design helps them to grind up soft food waste. Similar to vegetable scraps or small bits of meat. Still, they may struggle to process hard objects like rocks. When rocks enter the disposal unit, they can get inside the grinding chamber. As well as showcase impedes the movement of the disposal’s blades.
Here’s how rocks can contribute to clogs in garbage disposals:
Blockage of Grinding Mechanism
Rocks are much harder than typical food waste, and when they enter the disposal, they may not break down as intended. Instead, they get stuck in the grinding mechanism, preventing it from operating smoothly.
Reduction in Water Flow
Rocks lodged in the disposal can impede the flow of water through the unit. Reduced water flow can hinder the disposal’s ability to flush out ground-up food waste, leading to buildup and potential clogs.
Obstruction of Drainage Pipes
If rocks manage to pass through the disposal not always they will get stuck. But if they are too large to flow freely through the drainage pipes they will get stuck. They can become stuck further down the line, contributing to a clog in the plumbing system.
How to get rocks out of garbage disposal
Now that you have enough knowledge about how much damage rock can cause. It’s time we go for the solution and bring the tremble out before it goes for a rampage.
So, we need the right process on how to get rocks out of garbage disposal:
Power Off
Before you begin any work on your garbage disposal, it’s essential to cut off the power supply. Locate the circuit breaker or switch controlling the disposal unit and switch it off to prevent accidents.
Visual Inspection
Turn on your flashlight, and carefully inspect the disposal chamber. Identify the rocks’ location without inserting your hands into the unit. Safety is paramount.
Extraction
Using long-handled tongs or pliers, delicately remove the rocks from the disposal chamber. Take care to grip them firmly and extract them slowly to avoid causing damage to the disposal’s components.
Flush with Water
Once the rocks are clear, run cold water through the disposal unit for several minutes. This helps flush out any lingering debris and ensures the disposal is clean and obstruction-free.
Disposal Techniques
Once the rocks or other objects from your garbage disposal are no more. Proper disposal techniques are essential to ensure environmental responsibility and safety.
Here’s how to dispose of materials effectively:
Household Trash or Recycling Bin
Discard extracted rocks in your household trash or recycling bin, depending on their composition and size. Be mindful of local recycling guidelines and regulations.
Composting Organic Waste
Consider composting organic materials such as fruit and vegetable scraps instead of using the garbage disposal. Composting is an eco-friendly way to reduce waste and create nutrient-rich soil for gardening.
How to Identify if a Garbage Disposal Has Rocks in Its System
Identifying whether rocks have found their way into your garbage disposal system is essential for addressing potential issues before they escalate.
Here are some comprehensive methods to determine if your garbage disposal contains rocks:
Unusual Noise
Rocks stuck in the disposal can cause grinding or scraping noises when the unit is in operation. If you notice any unusual sounds emanating from the disposal during use, it could indicate the presence of rocks.
Reduced Performance
Rocks obstructing the disposal mechanism may lead to lower performance. If you observe that the disposal is struggling to grind food waste or if water drains slowly from the sink. It could be a sign of a blockage that your rocks may cause.
Visible Debris
Take a visual inspection of the disposal chamber to check for any visible rocks or debris. Shine a flashlight into the disposal and look for any foreign objects. This will enable you to find debris in your system.
Impact of Rocks Getting Stuck on A Garbage Disposal Unit
When rocks or other hard objects become stuck in the garbage disposal. They can have far-reaching consequences for the appliance’s functionality and your kitchen’s plumbing system.
Here’s a comprehensive look at the impact of rocks getting stuck:
Blade Damage
Rocks can dull or damage the disposal blades. Reducing their effectiveness in grinding food waste and potentially leading to costly repairs or replacements.
Motor Strain
The motor of the disposal may experience strain as it attempts to grind against the resistance of the rocks. This strain can result in overheating, motor burnout, or premature failure.
Clog Formation
Rocks stuck in the disposal’s grinding chamber can affect the flow of water. As well as the food waste, leading to clogs in the plumbing system. These clogs can cause backups, foul odors, and even water damage to your kitchen.
Leakage
Excessive strain on the disposal caused by stuck rocks can weaken the unit’s seals and connections, leading to leaks or cracks. This leakage can result in water damage to surrounding areas and necessitate costly repairs.
By being vigilant for signs of rocks in your garbage disposal system. While figuring out the potential impacts of rocks getting stuck. You can take proactive measures to address issues promptly and minimize damage. Regular maintenance and careful disposal practices are key to preventing rock-related problems. Which will ensure the longevity of your garbage disposal unit.
Common Mistakes to Avoid for A Garbage Disposal Unit
When it comes to dealing with garbage disposal issues. Avoiding common mistakes is crucial for preventing accidents and maintaining the appliance’s functionality. Here are some details on what you should avoid:
Operating the Disposal While Power is On
One of the most dangerous mistakes homeowners make is to remove objects. It’s not anyway safe to remove objects or dispose while it’s still on. Always ensure the power is switched off before performing any maintenance or extraction tasks.
Using Bare Hands
Never reach into the disposal chamber with your bare hands to retrieve objects. Even if the power is off, there may still be sharp blades or other hazards inside. Always use appropriate tools such as tongs or pliers.
Overloading the Disposal
Avoid putting too much food waste into the disposal at once, as this can overwhelm the system and lead to clogs or damage. Dispose of food waste gradually, allowing the disposal to process it efficiently.
Using Chemical Drain Cleaners
Chemical drain cleaners may seem like a quick fix for clogs, but they can cause more harm than good. These harsh chemicals can damage the disposal unit and may also harm the environment. Opt for safer alternatives such as enzymatic cleaners or mechanical methods.
Prevention and Maintenance Tips For Garbage Disposal Unit
Proactive maintenance and preventive measures are key to keeping your garbage disposal in optimal condition. Here are some comprehensive tips to help you maintain your disposal:
Mindful Disposal Practices
Avoid putting large or hard items like rocks, bones, or fruit pits into the garbage disposal. Stick to disposing of soft food waste and small scraps that can be easily broken down.
Regular Cleaning Routine
Incorporate regular cleaning into your kitchen maintenance routine by running cold water and a small amount of dish soap through the disposal. This helps remove grease and food particles, preventing odors and buildup.
Blade Maintenance
Keep the disposal blades sharp and fresh by periodically grinding ice cubes and citrus peels. The ice helps to sharpen the blades, while the citrus peels leave behind a fresh scent.
Avoiding Grease Buildup
Never pour grease or fat down the disposal, as they can solidify and cause clogs over time. Instead, dispose of grease in a separate container and discard it in the trash once it solidifies.
FAQ
- Can I safely remove rocks from my garbage disposal?
- Yes, but ensure the power is off first. Use tongs or pliers to carefully extract rocks, avoiding damage to the disposal.
- What if I can’t reach the rocks with tools?
- Try using a vacuum with a nozzle attachment to suction out the rocks or flushing them out with water.
- Can rocks damage the garbage disposal?
- Absolutely. Rocks can cause serious damage to the disposal blades and motor. Remove them promptly to avoid costly repairs.
- Is it safe to use chemicals to dissolve the rocks?
- No, using chemicals is not recommended. They may damage the disposal and pose safety hazards.
- How can I prevent rocks from entering the garbage disposal?
- Be mindful of what goes down the drain. Use a drain strainer to catch solid particles and prevent damage to the disposal.
Conclusion,
By following this comprehensive guide on how to get rocks out of garbage disposal. You can avoid common mistakes, by implementing preventive measures and adopting proper disposal techniques. This will help you ensure the longevity and optimal performance of your garbage disposal unit. As well as minimize environmental impact. Remember, proactive maintenance is key to preventing costly repairs and ensuring smoother functionality.
by avi | Apr 28, 2024 | Tips
If you are stuck on why the garbage disposal is stuck. Then just simply “resetting the disposal” can be a better option. Instead of panicking and calling for a professional who charges for nothing it’s better to fix it yourself. Sometimes simple clog or overload can be a cause of hold up. Now when it’s time to act you may be wondering yourself “Where is the reset button on a badger garbage disposal ?”
For your comfort, it’s better to know where the reset button lies. Simply, you will find the reset button underneath the disposal unit. You can try to reset the whole function in just a few minutes. This is the easiest way to figure out if your garbage disposal unit is right and ready to work.
What is a garbage disposal unit?
A garabge dispoall unit is a grabage disposer. It disposes of the waste and disposal element you have during kitchen work. It’s a necessary household appliance for the kitchen. Its work is to shred food while it goes along the drain channel.
When food scraps get inside the disposal unit. They get cut off by the rotating blades or impellers inside the grinding chamber. The resulting particles then flush away using the water through the drainpipe, ultimately entering the wastewater system. Garbage disposal units are very common for residential kitchens to facilitate the disposal of organic food waste.
Famous garbage disposal unit model
InSinkErator is the most famous company that produces where is the reset button on a badger garbage disposal units for kitchen appliances. They are a division of Emerson Electrical Co. They make high-quality and reliable garbage disposal for use purposes.
Instead of their famous announcing their device typically starts from $ 80-$500. This range varies for the difference in features and other elements. Things like horsepower, footprint, quieter operation, etc.
Here are some famous models from InSinkErator:
- InSinkErator Badger 5: This is one of the most popular and affordable models. Costs only around $80 to $120. As for the horsepower, it’s around ½.
- InSinkErator Evolution Compact: This mid-range model has quieter operation and ¾ horsepower. The typical cost is around $150 to $250.
- InSinkErator Evolution Excel: A premium model offering 1 horsepower. Advanced technology and features as well as quieter operation. While only ranging from $300 to $500.
Where is the reset button on a badger garbage disposal
If your garbage disposal unit is not working properly maybe it’s time for a quick reset. It will help you to figure out if your device is okay or not. Your badger garbage disposal can face clogging or jamming out of the blue.
First look for the bottom portion of your disposal unit of your InSinkErator disposal. Especially for the badger series the button residers in two possible locations. The first is at the bottom of your device and the second is on the side of the unit. It is usually a red or black button
Here is a simple explanation of badger garbage disposal and how the reset mechanism works:
Purpose of reset
The reset button serves as a circuit breaker for the disposal. If the disposal gets jammed or encounters a large amount of resistance as well as heat. The reset button trips off which cuts off the power.
Tripping of button
The reset button design helps it to trip automatically when the ripping condition is met. Such as overload or over-pressure also overheating. This helps to prevent the device or unit from damaging its motor and components of disposal.
Resetting the disposal
To reset the disposal unit go to the bottom of the device or look on the side of it. There should be a red or black switch that is clickable. Just simply press the button and long-press it. This will reset the unit. This action reset the internal circuit of the disposal unit and allows the unit to resume working. This is very helpful when facing a jam or overload of the unit.
Figuring out Where is the reset button on a badger garbage disposal will be an immense help for you. You will be able to fully figure out your problem and a simple solution for your unit. Offering you a great opportunity for DIY repair which costs less and works great.
Common Causes For Reset Button Tripping
The reset button trips for various reasons. Things such as jamming or blocking can cause the mechanism to trip. Overloading with too much food can be a cause of tripping as well. Overheating motor can be a common cause due to long periods of heavy usage.
How to Preventing Tripping of the Reset Button on Badger Disposal Unit
To prevent the reset button from tripping frequently, it’s essential to use the garbage disposal properly:
- Avoid grinding large amounts of food waste at once.
- Cut large food items into small pieces before discarding them.
- Use cold water to flush waste through the system while the processor is running.
- Avoid dumping hard or other waste. solid food foods such as bones, fruit pits, metal, or glass.
Conclusion,
Learning Where is the reset button on a badger garbage disposal will help you immensely in time of maintenance. This will ensure the safe and efficient operation of your badger disposal unit. But if you are facing frequent issues while resetting your unit maybe you should call for backup. A professional plumber or company manufacturing unit may be your best choice for a better solution.
FAQ
- Does the Badger garbage disposal have a reset button?
- Yes, most Badger garbage disposals are equipped with a reset button. This button is a safety feature designed to trip and shut off the disposal if it becomes overloaded or jammed.
- Where is the reset button located on a Badger garbage disposal?
- The reset button is typically located on the bottom or underside of the garbage disposal unit. Look for a small red or black button. It may be recessed, so use a flashlight to locate it.
- When should I use the reset button on my Badger garbage disposal?
- Use the reset button when the disposal stops working, often due to overload or a jam. If the disposal motor shuts off, pressing the reset button can restart the unit once the issue is resolved.
- How do I reset my Badger garbage disposal using the reset button?
- First, ensure the disposal is turned off. Locate the reset button on the unit, press it in firmly, and then turn the disposal back on. If the disposal was jammed, you might need to manually free the blades using an appropriate tool before resetting.
- What if pressing the reset button doesn’t fix the issue with my garbage disposal?
- If the reset button doesn’t resolve the problem, there may be a more significant issue. Check for obstructions or jams in the disposal and use a disposal wrench or hex key to manually rotate the blades. If problems persist, consult the Badger disposal’s user manual or contact the manufacturer’s customer support for further assistance.
 Call Now